- Create an AWS EC2 instance with HashiCorp Terraform provider - Fri, Jul 29 2022
- Introduction to Docker Bind Mounts and Volumes - Mon, Oct 8 2018
- Managing Windows file shares with PowerShell - Mon, Aug 13 2018
As a server admin, I had a hard time trying to host an internal NuGet feed for my PowerShell modules. I'd like to share the steps I took to set up the NuGet.Server package to run under IIS on my local web server. First, let's look at what you need to set this up.
Requirements
- Visual Studio (I'm using Visual Studio 2017)
- Windows Server running IIS with the following Windows features installed: Web-Server, Web-WebServer, Web-Common-Http, Web-Default-Doc, Web-Dir-Browsing, Web-Http-Errors, Web-Static-Content, Web-Health, Web-Http-Logging, Web-Performance, Web-Stat-Compression, Web-Security, Web-Filtering, Web-App-Dev, Web-Net-Ext45, Web-Asp-Net45, Web-ISAPI-Ext, Web-ISAPI-Filter, Web-Mgmt-Tools, Web-Mgmt-Console

Windows web features for running NuGet.Server
NuGet.Server Visual Studio Project
Before deploying NuGet.Server to IIS, we need to create an ASP.NET web application in Visual Studio. Go to File > New > Project. In the Search box, search for ASP.NET Web Application. Select the ASP.NET Web Application (.NET Framework) template for C# and set the Framework to .NET Framework 4.6 or higher. Also, give the project a name other than NuGet.Server and then click OK.

Create an empty ASP.NET web application in Visual Studio
On the next screen, select Empty from the list and click OK.

Select to create empty ASP.Net web application
After creating the empty ASP.NET web application, right-click on the project under Solution Explorer and click on Manage NuGet Packages.

Select Manage NuGet Packages under Solution Explorer
In the NuGet Package Manager window, click on Browse. Then search for NuGet.Server in the search box. Select NuGet.Server from the search results and install the latest stable version.

Install the latest version of the NuGet.Server package
When you install the NuGet.Server package, it will make some changes to your solution and convert your empty web application into a package source. Click OK if it asks you to proceed.
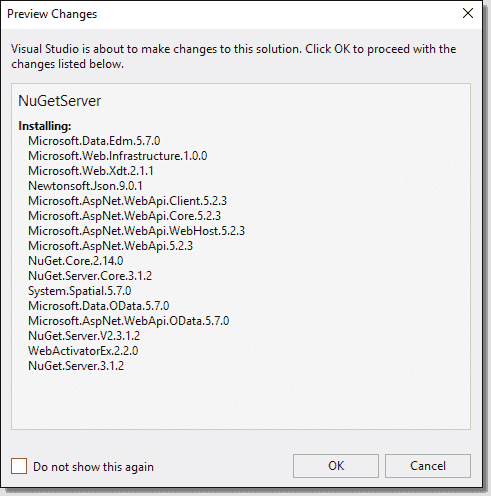
Proceed with changes to the web application
Installing the NuGet.Server package will set up a Packages folder and modify the web.config file with the required settings.
Microsoft warns that you should carefully inspect the web.config file after the modifications have completed. NuGet.Server may create duplicate elements in this file instead of overwriting them.

Warning about possible duplicate elements in web.config (source Microsoft)
If you would like to make certain packages available after NuGet.Server's deployment, place their .nupkg files in the Packages folder in the project. Right-click the Packages folder and go to Add > Existing Item.

Add an existing package to the Packages folder
Browse to the location of the .nupkg file, select it, and click Add. I'm going to add a TestModule package for this demonstration.

Select a package to add to the Packages folder
If you are adding a .nupkg file, make sure to right-click on it, click Properties, and then set the Build Action to Content and set Copy to Output Directory to Copy Always.

Set the Build Action and Copy to Output Directory properties
We can test the web application by running it locally through Visual Studio. Click Debug and select Start Without Debugging (Ctrl+F5).

Test web application locally
When the home page loads, you should be able to see any errors (if there are any). If there are no errors, this page will display the package feed URL.

NuGet.Server home page running locally
If you click the Here link in Click here to view your packages, you should be able to see any packages you added to the Packages folder. (Note: this link did not work for me in Edge, so I used Internet Explorer to view this page.)
View packages added to the project
API key
If you would like to allow users to push or delete packages from the server, you will need to specify an API key in the web.config file. You can modify the following section to specify whether an API key is necessary to push or delete packages and also specify the required API key.

The API key settings for NuGet.Server
If packagesPath is blank or omitted, the package folder will be the local ~/Packages folder. Otherwise, it will be whichever path you specify for this value.

Setting the path to the Packages folder in NuGet.Server
Deploying NuGet.Server
Once you have successfully tested the local deployment, you can go ahead and deploy the application to your IIS site. For this demo, I am going to save my solution and simply copy my files over to my web server.
First, let's make sure the web server has IIS set up on it. If you haven't done so already, install IIS by running the following command in PowerShell:
[code language="powershell"] Install-WindowsFeature Web-Server, Web-WebServer, Web-Common-Http, Web-Default-Doc, Web-Dir-Browsing, Web-Http-Errors, Web-Static-Content, Web-Health, Web-Http-Logging, Web-Performance, Web-Stat-Compression, Web-Security, Web-Filtering, Web-App-Dev, Web-Net-Ext45, Web-Asp-Net45, Web-ISAPI-Ext, Web-ISAPI-Filter, Web-Mgmt-Tools, Web-Mgmt-Console [/code]
After installing IIS, open up Internet Information Services (IIS) Manager. Expand Server Name > Sites > Default Web Site. Right-click on Default Web Site and then click on Add Application.

Add application under Default Web Site in IIS
On the Add Application window, enter an Alias for the application. I'm using NuGet. Then select the Application pool you wish to use. I'm using the DefaultAppPool. Specify the Physical Path for the location of the files. I created a folder under C:\inetpub\wwwroot\ called NuGet. Then click OK.

Configure the application settings
You should see your NuGet application listed under the Default Web Site.

New NuGet application under Default Web Site
Now copy the files from the Visual Studio project (C:\Users\matt\source\repos\NuGetServer\NuGetServer for me) to the physical location of the NuGet application (C:\inetpub\wwwroot\NuGet).
You should now be able to browse to your web using the URL of the new web application you just created in IIS (http://web01/NuGet/).

NuGet.Server running under IIS
Registering the NuGet.Server feed as a PowerShell repository
Now that NuGet.Server is up and running on the web server, we can register it as a repository in PowerShell. Run the Register-PSRepository cmdlet using the URL from the NuGet.Server home page as the SourceLocation and PublishLocation.
[code language="powershell"] Register-PSRepository -Name NuGetServer ‑SourceLocation http://web01/NuGet/nuget -PublishLocation http://web01/NuGet/nuget -InstallationPolicy Trusted [/code]

Register NuGet.Server feed as a PowerShell repository
Now to test the feed, I'm going to run Find-Module against the new repository to see that it returns TestModule.

Run Find Module to return TestModule
Now that you've set up NuGet.Server, you can publish and download your PowerShell modules and DSC resources internally. I hope you found this tutorial helpful.


-480x270.webp)


-480x270.png)

-480x270.png)
-480x270.png)
-480x270.png)
-480x270.png)

-480x270.png)
-480x270.png)
-480x270.png)


This is good, but how do we query for package – version, and delete using the REST api?
What are the URL’s that we would use? I have tried a few different ways and none work yet.
http://myserver.mycompany.com/MYREPO/nuget/Packages, etc. Nothing seems to work.
Any thoughts?